
If automatically connecting your 1&1 IONOS domain failed, try the steps in this guide instead. You may also find 1&1 IONOS' guide helpful as you work on the connection.
If you're connecting your 1&1 IONOS for the first time, visit Connecting a 1&1 IONOS domain to your Squarespace site.
Before you begin, review our requirements for connecting a third-party domain.
Tip: If your domain is eligible, we recommend transferring it instead of connecting it. Learn more about the differences between transferring and connecting or get started with a transfer.
Navigating your 1&1 IONOS account
The screenshots in this guide show how a 1&1 IONOS account looks if you're in the United States, using a MyWebsite package, and have access to the beta version of their DNS panel. If you're in a different country, or using a different plan, your experience might be slightly different.
To follow this guide, be aware of the following in your 1&1 IONOS account:
- When logging into 1&1 IONOS, ensure you’re logging into the Control Panel, and not the Customer Shop.
- Ensure you can access your Domain Center. You can usually get there by first clicking Home in your left sidebar.
- If you’re still having trouble navigating your account, contact 1&1 IONOS’ support team.
Step 1 - Start the connection in Squarespace
To connect your domain, start in the Domains panel:
- In the Home Menu, click Settings, then click Domains. You can also press the ? key while any panel is open and search domains.
- Click Use a Domain I Own.
- Enter the full domain name you’re linking in the Domain Name field, then click Continue.
- Click Connect From Provider.
Note: If you see a message that says "This domain is already connected to another Squarespace site," check your other Squarespace sites to find where the domain is connected, then disconnect it from that site.
- Select Other from the drop-down menu, if it's not already selected.
- Click Connect Domain.
- In the message that appears, click Okay.
- A new panel will open with the records to create in your 1&1 IONOS account. Keep this panel open for your reference.
Step 2 - Log into 1&1 IONOS
Open a new browser tab or window to access your 1&1 IONOS account:
- Go to www.ionos.com and log into your Control Panel.
- In the domains list, find the domain you’re linking to Squarespace.
- Click the
 to the right of the domain and select DNS.
You'll now copy the records from the Squarespace DNS Settings panel to link the domain to your site.
Note: Don't delete MX records during this process. MX Records connect your email address, and deleting them could interfere with your email service.
Step 3 - Add the first CNAME
In the first line of your Squarespace DNS Settings, copy the unique code that appears directly below the Host column. The unique code is a random string of numbers and letters that must point to verify.squarespace.com. In your 1&1 IONOS DNS settings, you'll add a new record with these values:
| Host | Type | Points to |
| Copy and paste the unique code under Host on the first line | CNAME | verify.squarespace.com |
- In your 1&1 IONOS DNS settings, adjust the filter at the top of screen to Display All Records.
- Above your existing records, click Add Record. On the next page, click CNAME.
- On the next page, enter data for the first CNAME:
- In the Host Name field, paste the unique code from Host column of your Squarespace DNS Settings panel.
- In the Points to field, enter verify.squarespace.com
- Leave the TTL option as 1 hour
- Click Save.
Note: If you don't add this CNAME, or if it's entered incorrectly, the domain will unlink from your site after 15 days. If this happens, you can start over to reconnect the domain.
Step 4 - Add the second CNAME
In the second line of your Squarespace DNS Settings, www appears directly below the Host column. This record must point to ext-cust.squarespace.com.
| Host | Type | Points to |
| www | CNAME | ext-cust.squarespace.com |
Note: Your Squarespace DNS settings might also display a second www Host with the Record AAAA. This is a nameserver record from 1&1 IONOS that you'll delete from your 1&1 IONOS settings later in the process, but you can ignore it when adding your Squarespace records to 1&1 IONOS.
- In your 1&1 IONOS DNS settings, ensure that your filter is still set to Display All Records.
- Click Add Record, then click CNAME.
- On the next page, enter data for the second CNAME:
- In the Host Name field, enter www
- In the Points to field, enter ext-cust.squarespace.com
- Leave the TTL option as 1 hour.
- Click Save.
Error message: A CNAME record can only be set for one subdomain
You may see this error message after clicking Save for the second set of CNAME records.
If you see this message, click Cancel and review the following in your existing 1&1 IONOS DNS Settings:
- Ensure the filter at the top of the page is set to Display All Records.
- Delete any other records with host www by clicking the to the right of the record and choosing Delete record. Confirm by clicking Delete again on the next page.
- Sometimes changes in 1&1 IONOS’ DNS settings take time to propagate. Wait at least one hour, then refresh your DNS setting using your browser’s refresh button.
- If you’re still having trouble, contact 1&1 IONOS support team and ask if you have other records that could be preventing you from adding the new CNAME.
Step 5 - Add A records
In the last four lines of your Squarespace DNS Settings, you'll see four IP addresses in the Required Data column. Using the steps below, create four A Records in 1&1 IONOS matching these values:
| Host | Type | Points to |
| @ | A |
198.185.159.144 |
| @ | A | 198.185.159.145 |
| @ | A | 198.49.23.144 |
| @ | A | 198.49.23.145 |
- In your 1&1 IONOS DNS settings, ensure that your filter is still set to Display All Records.
- Click Add Record, then click A.
- On the next page, enter data for the first A record:
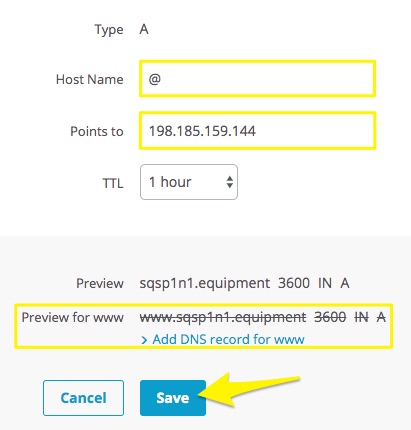
- In the Host Name field, enter @
- In the Points to field, enter 198.185.159.144
- Leave the TTL option as 1 hour.
- In the preview section, click Do not add DNS record for www. The preview will adjust to a crossed-out preview www record.
- Click Save.
Note: If you see an error message saying “The service will be disabled,” ensure you’ve completed #4 in the steps above. If you don’t click Do not add DNS records for www, 1&1 IONOS will attempt to add a record that overrides the second CNAME.
Repeat this process three more times using the following IP addresses, ensuring that you disable the additional www record with each record:
- 198.185.159.145
- 198.49.23.144
- 198.49.23.145
Note: If you have existing A Records, edit any with a Host Name @ so the Value matches the values above. If you see other A Records in your account that don’t match what’s shown in this guide:
- Host: @ or blank - Delete only if it doesn't match what’s shown in this guide.
- Host: Mail or Email - Don’t delete. This connects to your email address. Deleting it could interfere with your email service.
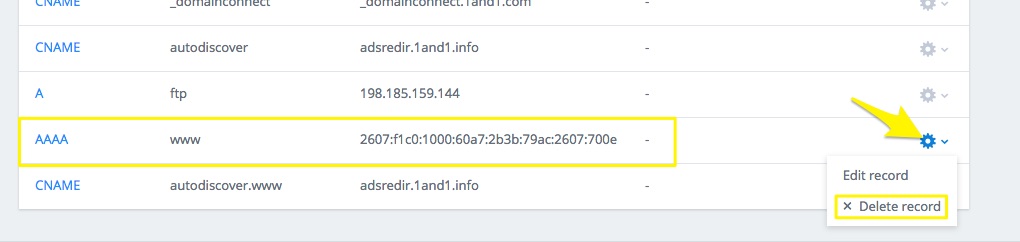
Step 6 - Delete AAAA Records
Delete any existing AAAA records in your 1&1 IONOS DNS settings, as these might conflict with your new records pointing to Squarespace.
- Ensure that your filter is still set to Display All Records
- Next to each AAAA record, click the to the right of the record and choose Delete record.
- Confirm by clicking Delete again on the next page.
Step 7 - Wait for the connection to complete
Now that you've entered the records, it can take 24 to 72 hours for the connection to start working properly. While you wait:
- You can return to your Squarespace DNS Settings, click Refresh below the records, and the Current Data column will start to show if your records are entered correctly. When the domain is correctly linked, it will appear in the Domains panel with a Connected label.
- It’s normal to see errors in the Domains panel or when visiting your domain for up to 72 hours after completing the steps in this guide. If you see any error messages after 72 hours has passed, see the next section.
Troubleshoot with the DNS record checker
If we detect that your records weren’t set up properly, your domain will appear in the Domains panel with the message Can’t verify domain ownership. To troubleshoot, use the DNS checker tool in the DNS Settings panel to see the exact CNAME and A Records to fix.
Getting more help
For more help with settings in your 1&1 IONOS account, contact their support team. To help them understand your issue, you can use one of our sample messages. You can also visit their documentation.
Comments
0 comments
Please sign in to leave a comment.