
The Profiles panel displays all customers, mailing list subscribers, members, and donors in one place, so you can get a holistic view of your engagement and manage relationships with your audience.
View profiles
All profiles display an email address and name. To view all profiles:
- In the Home Menu, click Profiles.
- Click All.
- Sort the list by details like name and email address.
- Account - Customers or donors who've created a Customer Account.
- Accepts marketing - Someone who has subscribed to at least one of your Email Campaigns mailing lists.
- Filter by tag, or search for a name or email address.
- Click a profile to see an overview of their engagement with your site.
- Click a card to see their customer, donor, or subscriber details.
Click a profile type—Customers, Subscribers, Members, and Donors—in the left panel to view all profiles in a specific category.
Tip: It’s not possible to delete profiles.
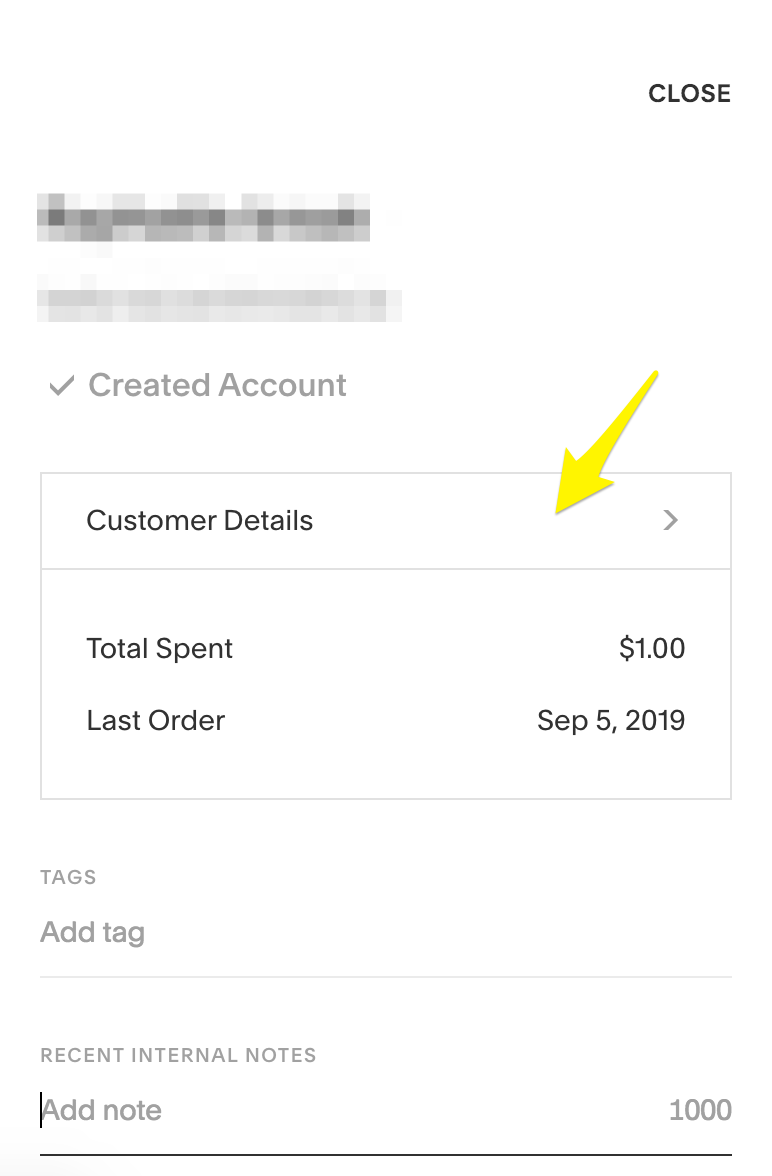
Customer profiles
To view key customer information:
- Click Customers in the left panel.
- Filter by the total number of orders, the date of their last order, their total amount spent, and if they have an account or not. You can also search by name or email address
- Click the Order or Recurring tabs to view the customer’s purchase history based on order type.
If you have a subscription to Member Areas, anyone who purchases a membership to your member areas appears in Customers. The member area name appears in Orders if the member area has a one-time fee, or in Recurring if the membership fee is recurring.
Subscriber profiles
To view all Email Campaigns mailing list subscribers:
- Click Subscribers in the left panel.
- Filter by mailing list, or search for a name or email address.
- Click a subscriber, then click Subscriber details to view:
- How many mailing lists they’re on
- Name and email address
- Subscriber status
- The date they first subscribed
The mailing lists they’re on are listed at the bottom of the profile. Click Remove to unsubscribe them from a list.
Donor profiles
To view donor details:
- Click Donors in the left panel.
- Search for the name or email address.
- Click a donor, then click Donor details to view:
- Date of their first donation
- Date of their last donation
- Email address
- Total amount donated
- Total number of donations
The individual donations are listed at the bottom of the profile. Manage them in the Donations panel.
Member profiles
To view members of all member areas on your site:
- Click Members in the left panel.
- Filter by Member Area, or search for a name or email address.
- Click a member, then click Subscriber Details to view:
- How many member areas they have membership to
- Name and email address
- Membership status
- The date they first became a member
To learn more, visit Managing members.
Accepts marketing
Customers with the Accepts marketing flag have subscribed to at least one of your Email Campaigns mailing lists. You can filter by this status to view all subscribers at once. It’s not possible to remove the flag for customers, but they can remove the flag by clicking Unsubscribe at the bottom of one of your marketing emails. To see the mailing lists visitors are subscribed to, click their profile and view the details in the right panel.
Member Areas
When a user creates a Customer Account and purchases a membership to a member area, we automatically tag their profile with the Accepts marketing flag. You can then initiate Email Campaigns to communicate with all members in a member area.
Conversely, members of free member areas will receive an automated opt-in confirmation email after completing the sign-up process. They’ll need to click a link in this email to confirm their interest in receiving email communications. Doing so will tag their profile with the Accepts marketing flag.
Add tags
You can add internal tags to help organize profiles and make them searchable. For example, creating a tag for "Top100" to identify top customers, or "Vegan" to track dietary needs. Tags aren't visible to your customers or donors. You can create up to 250 unique tags. To add tags:
- Click a profile.
- Scroll down to Tags.
- Enter a tag name.
- Select an existing tag, or click the tag text to create a new tag.
To remove a tag from a profile, click the X on the tag.
To view and manage all tags:
- Close the profile and click All in the left panel.
- Click the … icon in the top-right corner
- Click Manage tags.
- Click the … icon beside the tag name.
- To rename the tag, click Edit, enter the new name, then click Save.
- To delete the tag, click Delete, then click Delete to confirm.
Add notes
Add internal notes to keep track of customer details, like special shipping requests, previous interactions, and other key details. Internal notes aren’t visible to your customers.
- Click a profile.
- Scroll down to Notes.
- Click Add note and type your note.
- Click Save.
To edit a note, click the … icon beside the note. Make the changes, and click Save.
Export profiles
To export all profiles to a .csv file:
- Click All in the Profiles panel.
- Click the … icon in the top right corner.
- Click Export.
- Click Confirm.
Comments
0 comments
Please sign in to leave a comment.